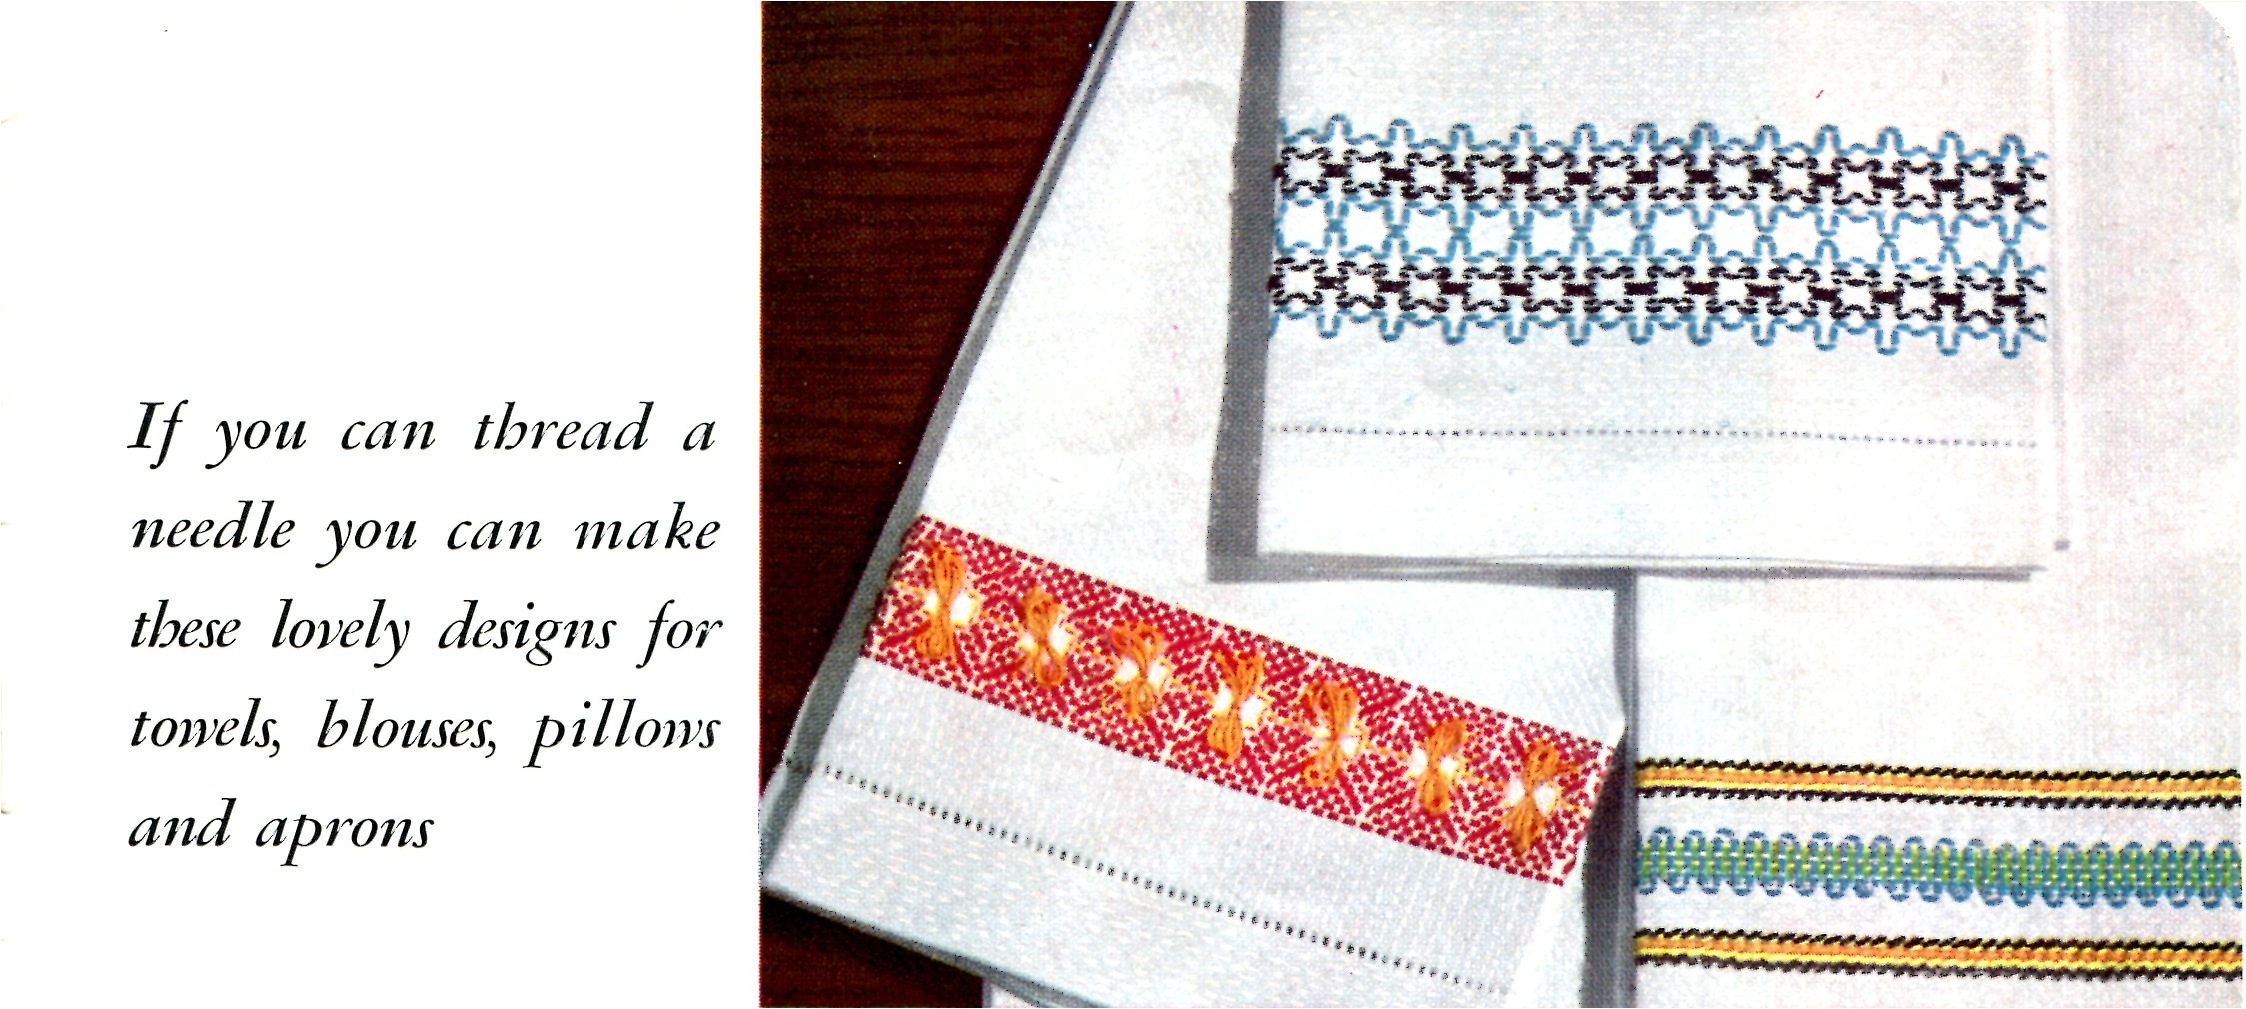
Swedish weaving is not difficult to do and you’ll be making many attractive pieces once you’ve learned the basics. It is a very simple type of weaving, using the raised threads on what is often considered huck toweling just like weaving on canvas.
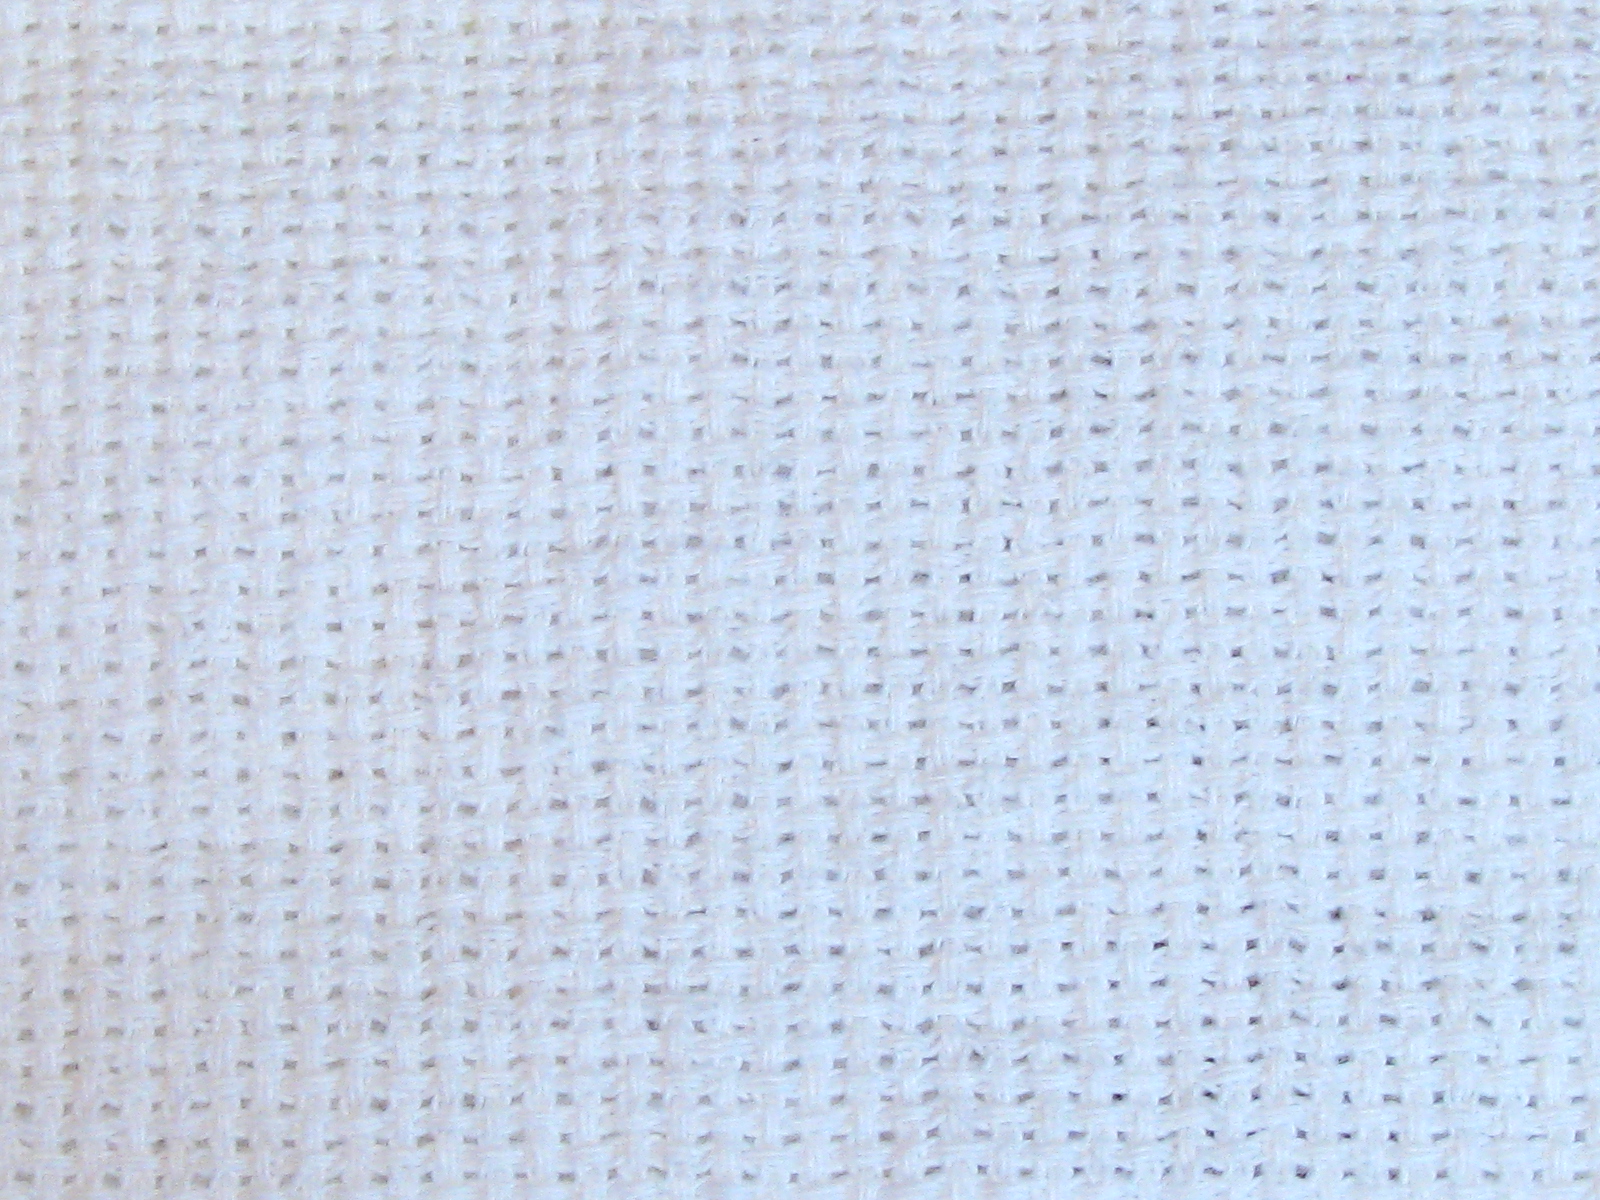
Huck toweling or Swedish weaving, refers to a type of embroidery work which is done on cloth of a special weave called huck. In this weave, there is a pair of vertical longer threads woven at regular intervals across the fabric. They are arranged as are bricks from row to one-half row. Sometimes evenweave fabric such as Aida can also be used.
Embroidery strands or yarns of various colors are slipped under the pairs of threads in various sequences to form interesting patterns. The decorative strands do not go through the material, so they do not show on the reverse side. A number of articles can be decorated, to include aprons, bibs, curtains, draperies, dresser scarves, knitting bags, napkins, place mats, purses, skirts, tablecloths, and towels.
Tools and Equipment
The tools and equipment needed for huck toweling are few and you may already have most of them.
a. Embroidery Floss. Either pearl cotton or 6-strand floss is used for articles which will need to be laundered frequently.
b. Huck fabric.
- Cotton. Available in a variety of colors. This is less expensive than linen huck and the pairs of threads are easier to see.
- Linen. Available in several colors. Good quality linen combined with handwork makes very nice towels, dresser scarves, and place mats.
There are towels available that are ready to embroidery with a blank evenweave fabric band.
c. Needles.
- Blunt-pointed tapestry needles, used for slipping under the pairs of threads in the huck.
- Sharp sewing needles, needed for sewing through the material as in hems.
d. Huck Patterns.
e. Metallic thread. Used for embellishing projects such as evening bags.
f. Pins. Used to pin hems, for example, and to mark the center of a piece to be embroidered.
g. Scissors.
h. Thimble.
i. Thread. Used for sewing hems and for garment constructions.
j. Yarn. Used to embroider articles that are not laundered, such as knitting bags and purses.
Instructions:
a. The item to be decorated should be well planned in order to center the design on the piece. It is sometimes advisable to complete the hems on the smaller articles in order to determine the correct size; however, skirts and purses can be completed better after they are decorated.
b. Selection of a pattern is an interesting and important part of the work. The pattern must be suited to the piece it will decorate.
- A large project, such as a skirt, an apron, draperies, or curtains, is suited to the larger pattern, which can be repeated several times in the project.
- Smaller patterns are better for small articles such as guest towels, bibs, and place mats.
- Exceptions to these generalities can sometimes produce rather dramatic effects. One large motif on a guest towel can be most effective. Small, border patterns combined with a large pattern can look very nice on a skirt.
- Interesting effects can be obtained by using two, three, or four colors of floss or yarn, by using metallic threads with colored thread; or by using different colored fabric.
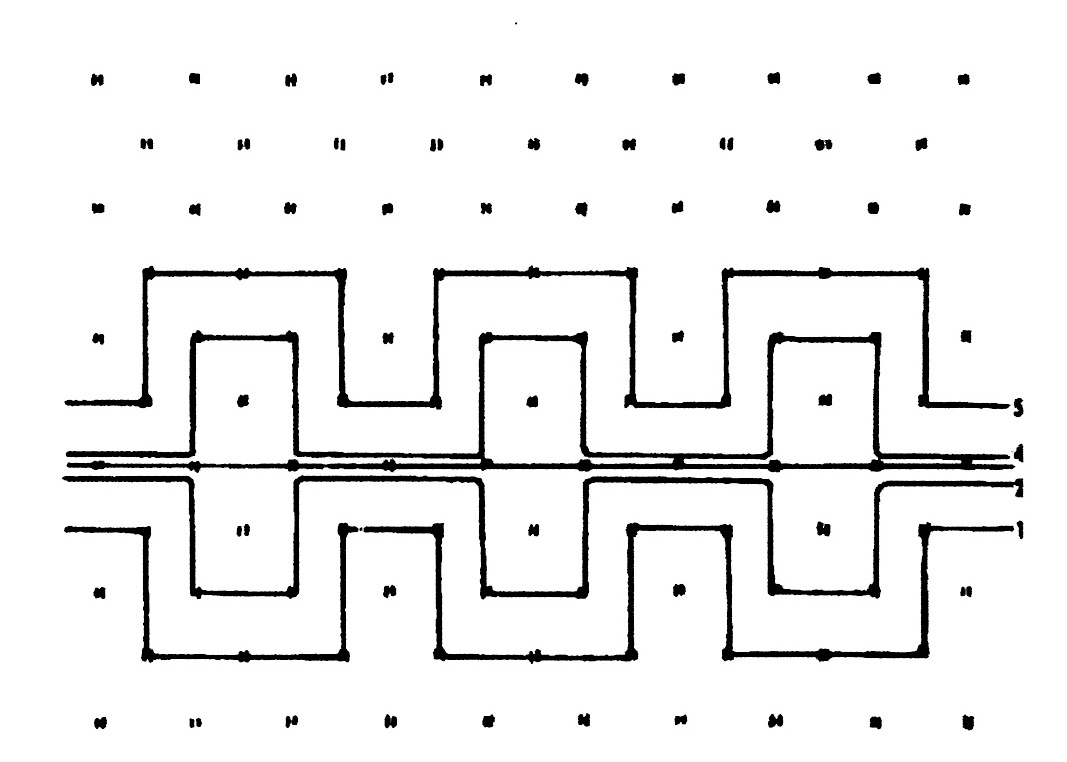
c. Because it is advisable to avoid splicing the strands of embroidery floss, each strand should be sufficiently long to be embroidered across the piece once. Some patterns indicate the necessary length of each strand. For example, No. 2, T 3 ½ means that the second row of embroidery needs a strand 3 ½ times the width of the material to be embroidered. The length of each strand in the pattern varies according to the number and size of the offsets in the pattern.
For instance, in figure 1, thread No. 3, which goes straight across will need to be just slightly longer than the width of the piece being embroidered, while strands 1, 2, 4, and 5 need to be more than two times the width of the piece or T 2 ½.
d. Centering the pattern is a very essential step, especially in smaller pieces where the entire pattern can be seen at a glance.
- Find the center pair of threads in the width of the material by folding the piece in half or by counting the pairs of threads across the row. Mark the center pair with a pin.
- Locate the center of the design in the pattern and mark it.
- Locate the center of the embroider floss or yarn and pull it half of its length under the center pair of threads.
e. Strand 1 in the selected pattern is worked first on one side of the center, then on the other by drawing the strand under the pairs of thread indicated in the pattern. Extreme care must be taken with this first strand of the design to insure accuracy in following the design because the placement of all subsequent strands are based on the first one.
A guide string of a color other than the pattern can be run straight across the piece and under each pair of threads. This can be helpful in starting the first strand of the pattern. Only the first strand needs to be centered, so others can be started at the right as is customarily done in sewing.

f. Reading patterns can be done in two ways; the method used depends upon the way in which the pattern is “written.”
- Some patterns are shown by means of a diagrammatic drawing, as has been done here. In such cases, the diagrams are followed by counting the pairs of threads diagrammed.
- Another method which is more difficult but more accurate for complex patterns, is to follow written directions. These directions are usually illustrated with photographs of the pattern; however, the photographs frequently do not show detail clearly. The code of the written directions is as follows:
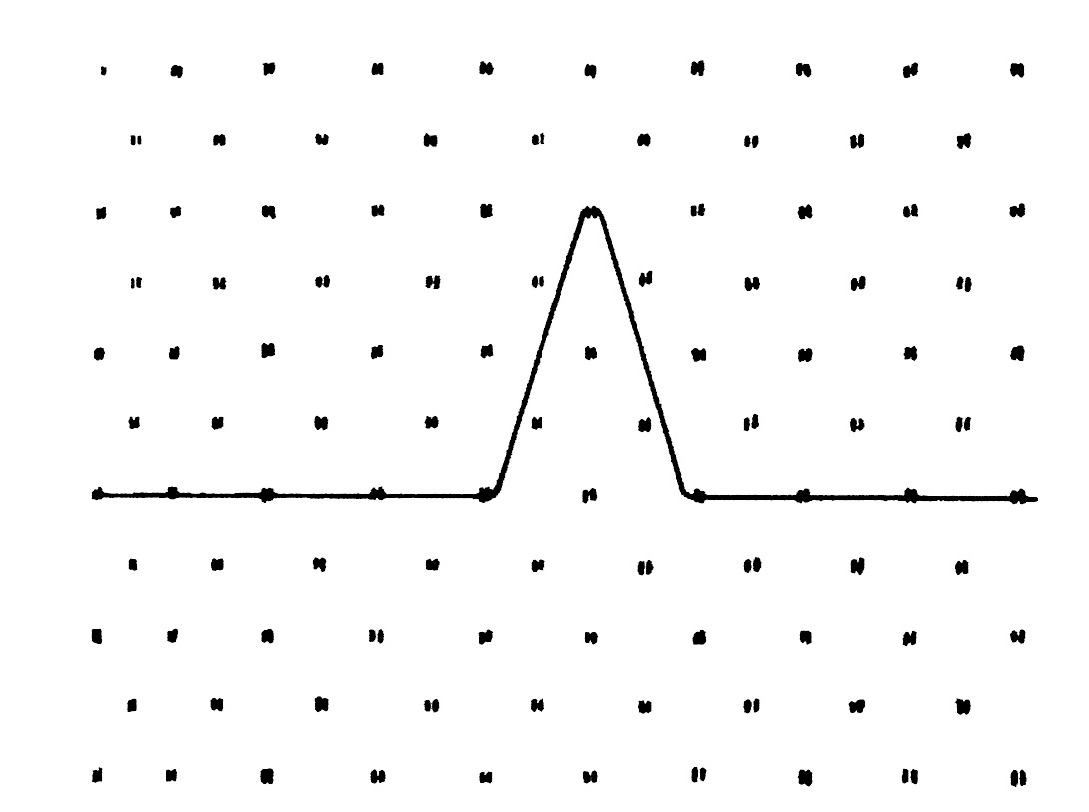
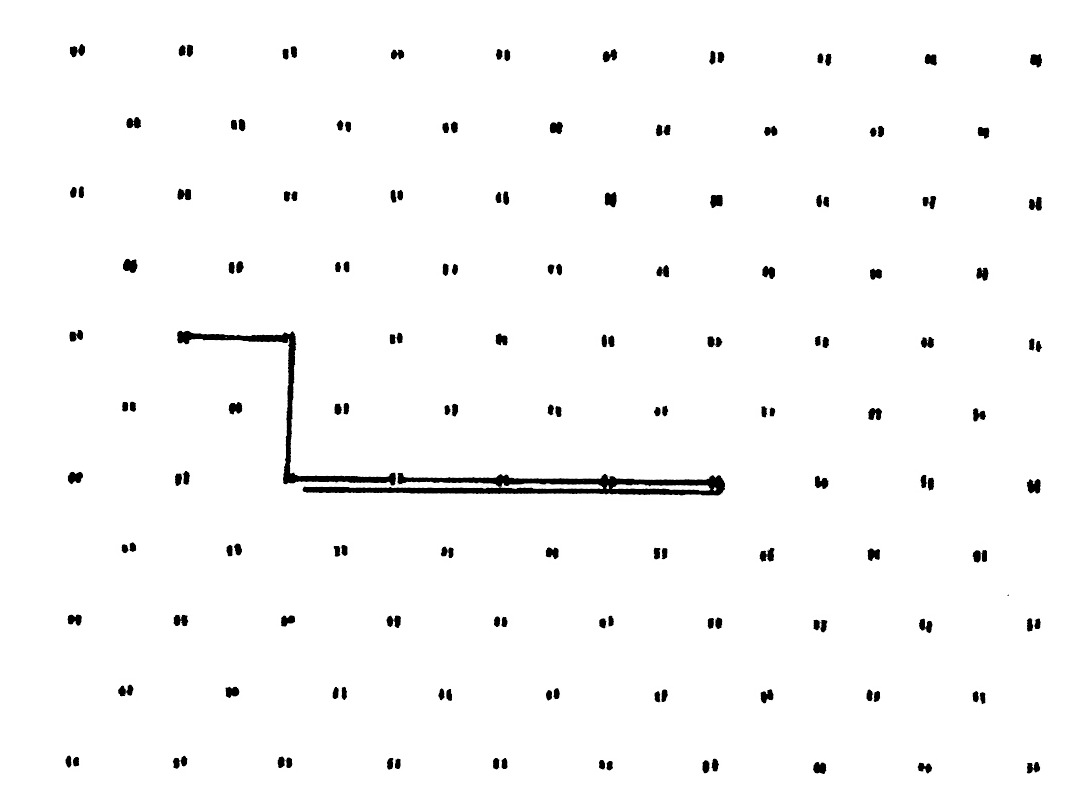
(a.) Symbols such as 1 over 2 are used to indicate offsets. This means to count one pair of threads ahead (1 over) and 2 pairs up or down (fig. 2).
(b) Open loops are indicated by ½ (meaning ½ over) by 1 ½ (one and one-half rows up). So ½ /1½ is as shown in figure 3, as is ½/2 ½ and ½ / ½.
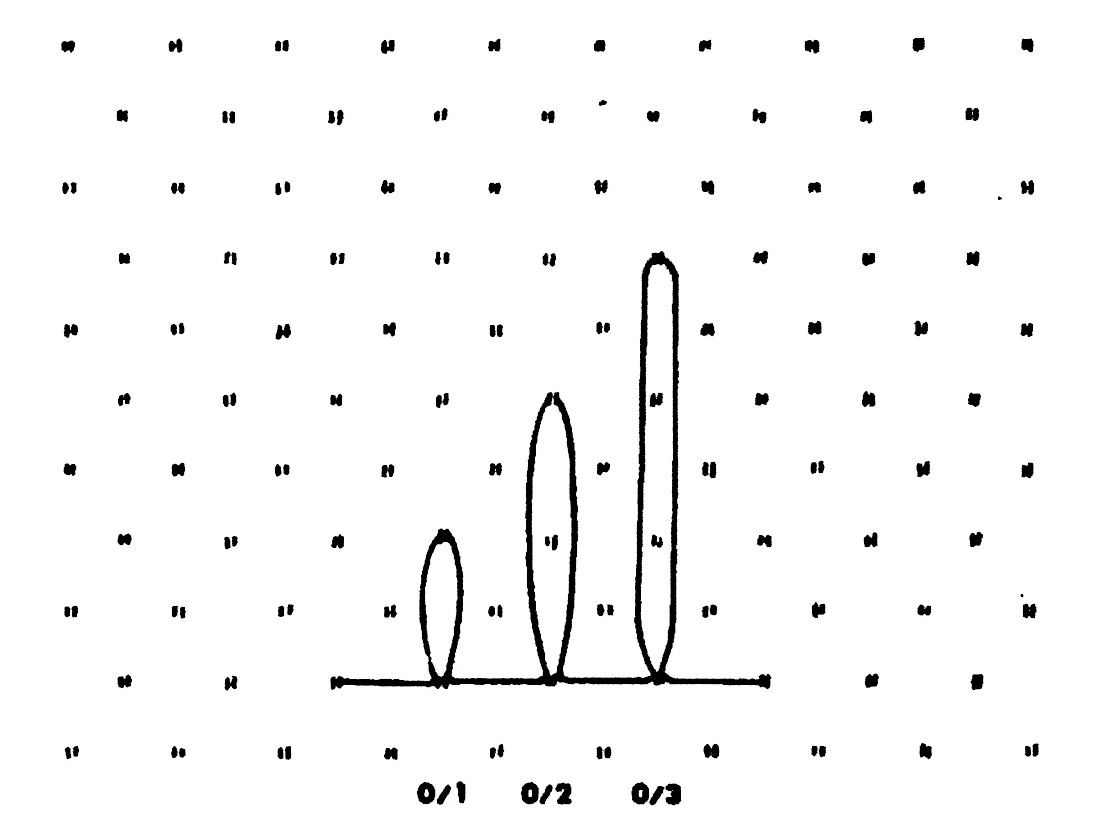
(c) Closed loops are written as 0/1, 0/2, and 0/3 (fig. 4). A loop of 0/4 is rarely used.
g. Ending the work is done in several ways; the method selected depends upon the project and the design.
- The end can be stitched into the edge of the huck and hidden in the hem.
- The strand can be woven back on itself for several pairs of threads (fig. 5)
Download Instructions: Right-Click the link and select either “save target as” or “save link as” depending on what browser you are using or simply click on it and save or print.
Here are some pretty patterns from a 1940’s Gifts booklet. These are written patterns rather than charts.
The Swedish Weaving pattern file below is from 1949 and includes charts with suggestions for color.
If you like this post, be sure to share it with your friends. And like our Facebook Page to get updates every time we post new patterns.
Enjoy!
This post may contain affiliate links. If you make a purchase after clicking on these links, I will earn a small commission. This helps to keep the content free. Read my full disclosure policy.

Looking for instructions on how to stitch patterns that go around the inside corners of the table runner rather than from end to end. Thanks
I’m not sure where to find instructions for that. Maybe a good pattern and instruction book on Swedish Weaving Embroidery. Also do a search on the Antique Pattern Library site.
Thanks!
Debra
I can’t believe I found you. My Grandma taught me to Swedish Weave when I was a little girl, I’m 74 now and have looked for this for long time. Found book on Amazon?? Your instructions are very good but I have trouble understanding written instructions but I’m going to look on YouTube?? Thank you so much.
Are their any free flower designs for swedish weaving ?
Hmmm I haven’t come across any. Huck weaving seems to be mostly geometric or linear patterns.
why does my yarn show on the back of my Swedish weave. what size needle do I need to use
Hi, You’ll always have some yarn showing on the the back of your Swedish weave work. I would make sure your stitches are even and the tension is correct so the back looks as good as the front. Also you may want to use an embroidery floss or perle cotton thread instead of yarn. A blunt pointed size 24 tapestry needle is usually used for Swedish weaving.
The website Nordic Needle has a very good write up on how to do Huck (Swedish Weaving) that includes some good tips and tricks.
Hope this helps. Thanks for your question.
Debra
Thank you for your very clear instructions on how to read a pattern!! So helpful.
You’re welcome.
I love your comments and directions on swedish embroidery. am working on an afhgan now and hope to be finish soon as it is a big project. I like the suggestion on how to end the row. thank you martha
You’re welcome. A swedish embroidery afghan is a big project. Glad I could help. Debra